Irresistibly Easy Cookie Dough Bites: Your Quick Path to Sweet Indulgence!
There’s something truly magical about the taste of cookie dough; it evokes childhood memories of baking with my parents, where we would sneak spoonfuls of dough when no one was watching. Those sweet, creamy bites hold a special place in my heart – they embody nostalgia, joy, and an indulgence that feels like home. With my Cookie Dough Bites (Quick + Easy Recipe!), you can bring that magic into your own kitchen—no ovens required!
These delightful little bites aren’t just easy; they’re a celebration of flavor and texture that beats any store-bought treat out there. I know what you’re thinking: aren’t they just raw cookie dough? Well, yes! And that’s what makes these bites so special—you get the unique flavor of cookie dough, but with the added luxury of a silky chocolate coating that takes them over the top. So, grab your apron and your loved ones! I promise that by the end of this recipe, you’ll have a sweet treat that not only melts in your mouth but also creates new family memories around the kitchen table.
Let’s dive into this fun and simple recipe that will earn you rave reviews from family and friends!
What Are Cookie Dough Bites (Quick + Easy Recipe!)?
Cookie dough bites have a long-standing place in American treat lore, having sprung from our love for that irresistible, creamy cookie dough that often gets overlooked in favor of the baked cookie itself. These delectable nuggets combine the rich taste of brown sugar, butter, and vanilla, perfectly balanced with the crunch of chocolate chips.
The texture? Think of a heavenly hybrid between chewy and creamy, all wrapped in a smooth chocolate shell that gives just the right amount of resistance before unveiling the doughy delight inside. What truly makes these bites stand out is their versatility; you can tweak flavors and quantities to match whatever mood strikes you or whatever ingredients you have on hand.
These bites are perfect for any occasion—whether you’re hosting a movie night, needing a last-minute gift, or simply want a sweet treat after a long day. They strike that perfect balance between indulgence and simplicity, making you the star of the dessert table or the comfort food you need on a rainy day.
Why You’ll Love This Recipe
- Quick and Easy: I promise you, you don’t need to be a baking pro to whip these up! With no baking required, this recipe comes together in under 30 minutes, plus a little chilling time. It’s perfect for those spontaneous dessert cravings!
- Customized for You: Unlike store-bought cookie dough bites, you have complete control over these! Want a nutty crunch? Toss in some chopped walnuts. Prefer a peanut butter twist? Substitute half the butter with creamy peanut butter for an unforgettable combination.
- Cost-Effective: Let’s face it—homemade treats are often way cheaper than their store counterparts. You can make a batch of these for a fraction of the price, while also controlling the ingredients.
- Family Favorites: This recipe has been tried and tested in my family, and it has quickly become a staple. Everyone raves about how they taste just like the dough you secretly love, but without the worry of food safety.
- No Special Skills Required: With just a handful of ingredients and straightforward steps, even novice bakers can create these bite-sized wonders. Your friends and family will never know how effortlessly you made these!
So, what are you waiting for? Let’s gather our ingredients and dive into this quick and easy cookie dough adventure!

Ingredients
To create your Cookie Dough Bites (Quick + Easy Recipe!), you’ll need the following ingredients:
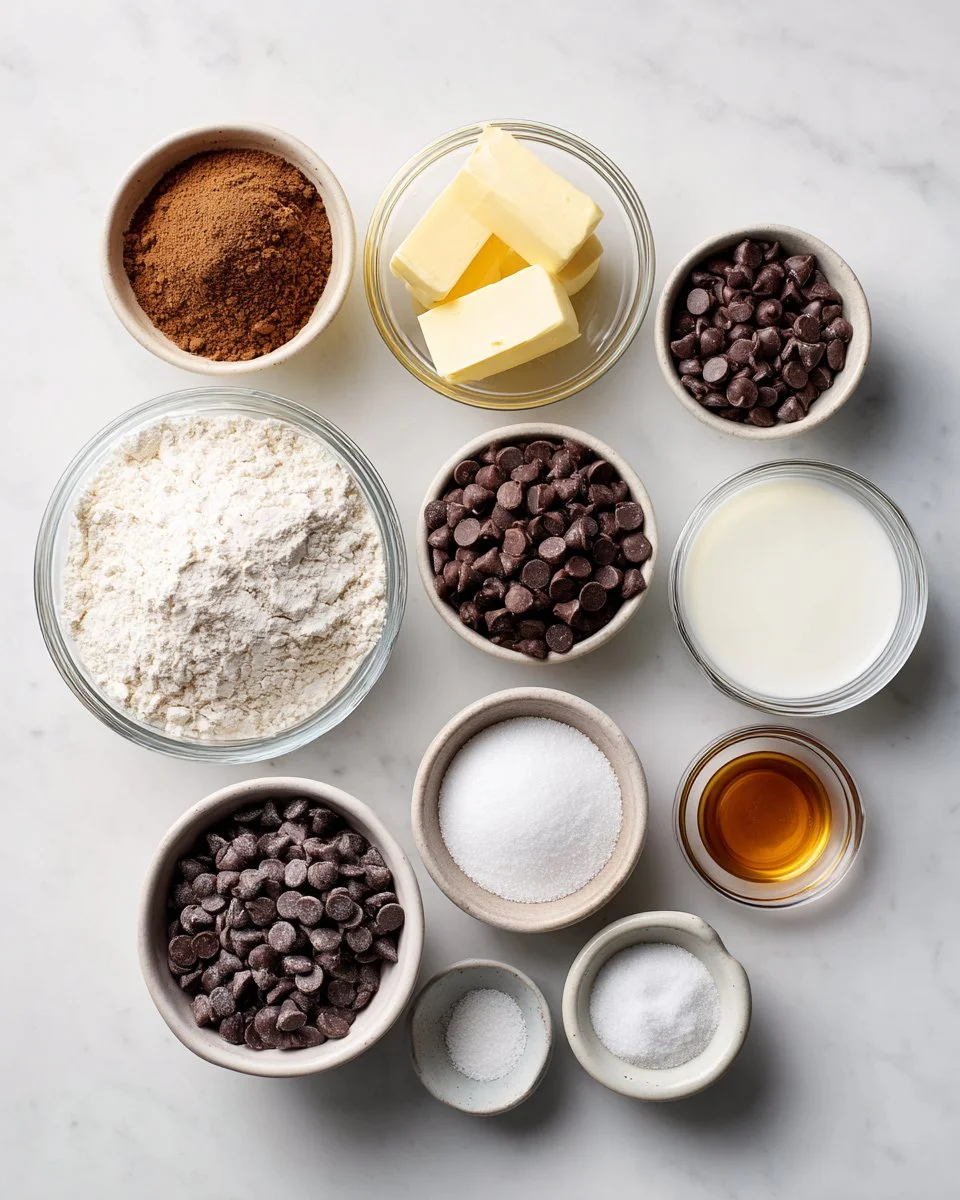
1⅓ cup all-purpose flour
Tip: For a gluten-free version, use a 1:1 gluten-free flour blend.¼ tsp salt
Balances the sweetness of the dough. Use sea salt for added flavor.½ cup butter (softened)
Ensure it’s at room temperature for easy mixing; I recommend using unsalted for better control over the sweetness.¾ cup brown sugar (packed)
Gives that rich, caramel-like flavor. Light or dark brown sugar both work wonderfully.2 tsp pure vanilla extract
Always opt for pure vanilla over imitation for a more robust flavor.3 tbsp milk
Whole milk works best, but you can substitute with almond or oat milk if you prefer.1 cup chocolate chips
I love using semi-sweet chocolate chips for that perfect balance of sweetness.2 cups milk or semi-sweet chocolate chips
More chocolate for coating! Use high-quality chocolate chips or even chopped chocolate bars for an indulgent touch.1 tsp oil
Use any neutral oil (like canola or coconut) to help the chocolate melt smoothly.
Prep Notes
- Make sure your butter is softened at room temperature to ensure a creamy batter.
- Pre-cook your flour to ensure it’s safe to eat—trust me on this!
Step-by-Step Instructions
Pre-Cook the Flour: To ensure the flour is safe to eat, microwave the flour in a microwave-safe bowl for 1 minute 30 seconds, stirring every 30 seconds. Alternatively, spread it out on a baking sheet and bake at 350°F for 5-10 minutes until it reaches an internal temperature of 160ºF. This key step means you can enjoy that cookie dough goodness without worry! Chef’s Tips: Let it cool slightly before using.
Make the Cookie Dough: In a large bowl, mix the softened butter and brown sugar until creamy and well combined (about 2-3 minutes). Add in the vanilla extract and milk; stir until mixed. Gradually incorporate your pre-cooked flour and salt until just combined. Gently fold in the chocolate chips. Chef’s Tips: Avoid overmixing as it can lead to a denser dough!
Chill the Dough: Cover the bowl with plastic wrap and chill the dough in the refrigerator for 10 minutes, which makes shaping so much easier!
Form Bites: Once chilled, roll small portions of dough (about a tablespoon each) into balls and place them on a lined baking sheet. Freeze for 15 minutes to firm up the dough.
Melt Chocolate for Coating: In a microwave-safe bowl, combine the chocolate chips and oil. Microwave at 50% power, stirring every 30 seconds until it’s completely smooth. You can also opt for a double boiler if you have one. Chef’s Tip: Be careful not to overheat the chocolate; it can seize up!
Coat the Bites: Remove the chilled dough bites from the freezer. Dip each one into the melted chocolate, ensuring it’s completely coated, and place it back on the lined baking sheet. Chef’s Tip: Use a fork to help lift the bites out of the chocolate, allowing excess chocolate to drip off.
Chill to Set: Refrigerate the coated bites until the chocolate has completely set, which should take around 10 minutes.
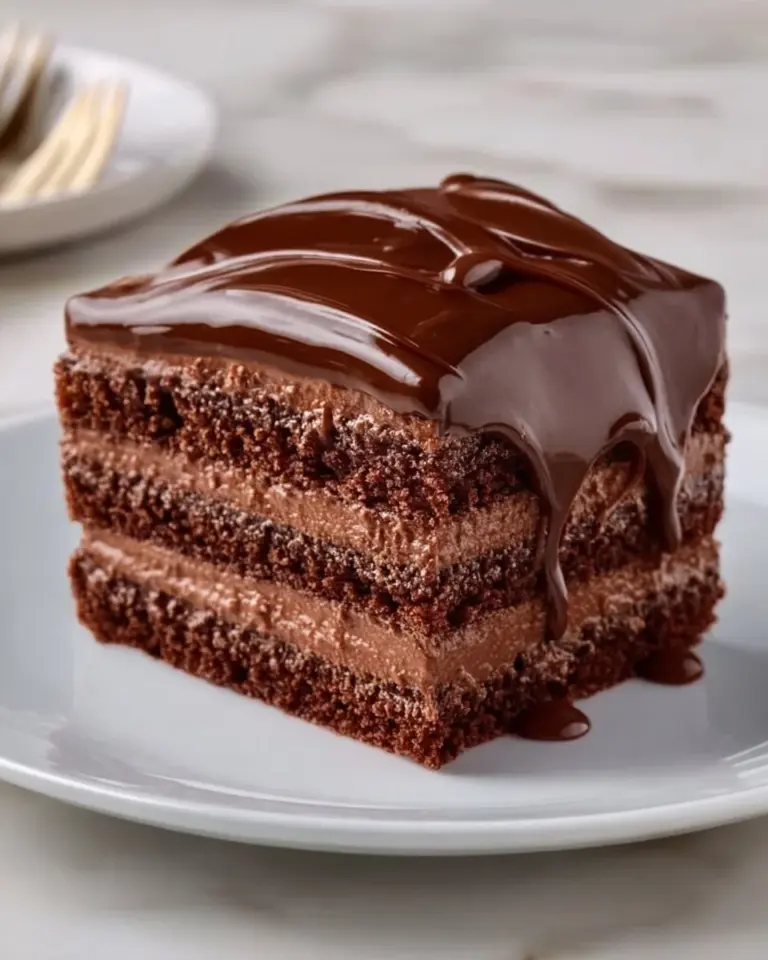
And voilà! Your homemade cookie dough bites are ready to be devoured. When I make these, I always have to hide a few for myself; they disappear so quickly!

Expert Tips & Tricks
Storage Recommendations: Store your cookie dough bites in an airtight container at room temperature for up to 2 days, or in the refrigerator for up to 1 week if you want them to last longer.
Make-Ahead Instructions: You can pre-cook the flour and prepare the dough up to a day in advance. Just ensure it’s well-covered in the fridge until you’re ready to roll and dip!
Troubleshooting Common Problems: If your chocolate is too thick for coating, simply add a bit more oil and reheat it gently until it reaches the desired consistency. If it starts to set before you finish coating, just pop it back in the microwave for a few seconds.
Serving Suggestions
These cookie dough bites are perfect on their own, but they also shine when paired with:
- A scoop of your favorite ice cream affectionately nestled on the side.
- A warm cup of coffee or hot chocolate that can balance out the sweetness.
For a lovely presentation, arrange them on a decorative platter and sprinkle some sea salt or drizzle with leftover chocolate for an elegant touch. Whether it’s a birthday party, movie night, or holiday gathering, these bites will steal the show!
Variations & Substitutions
Get creative with your Cookie Dough Bites (Quick + Easy Recipe!):
- Different Flavor Combinations: Mix in peanut butter chips, add a sprinkle of cinnamon for warmth, or try a different extract like almond or coconut for a twist.
- Dietary Restrictions: Make these vegan by using dairy-free butter, coconut oil, and dairy-free chocolate. Gluten-free options are available with appropriate flour blends as noted earlier.
- Seasonal Variations: Try pumpkin spice flavoring in the fall with pumpkin puree or peppermint extract as a festive twist during the holidays. You could even roll them in crushed candies for a seasonal treat!
Nutrition & Storage Info
- Prep Time: 15 minutes
- Chill Time: 25 minutes
- Total Time: 40 minutes
- Yield: Approximately 24 cookie dough bites
- Estimated Calories: About 120 calories per bite
Storage Instructions
- Room Temperature: Up to 2 days, stored in an airtight container.
- Refrigerator: 1 week.
- Freezer: For longer storage, freeze for up to 3 months. Just thaw them overnight in the fridge.
FAQ Section
1. Can I eat these cookie dough bites raw?
Absolutely! Just ensure you follow the recommended method for pre-cooking the flour for safety.
2. How do I keep chocolate from hardening while dipping?
Reheat it gently and keep it warm over a double boiler.
3. Can I use a different type of chocolate for coating?
Sure! Feel free to use white chocolate, dark chocolate, or even a mix.
4. What can I substitute for butter if I want a healthier option?
Coconut oil can be a great alternative, although the texture might be slightly different.
5. How do I store leftover cookie dough?
Store any leftover dough (uncoated) in the fridge for about a week, or freeze for longer storage.
6. Will these bites last long?
Yes! They last well up to a week in the fridge or can be frozen for up to 3 months.
7. Are these suitable for events with nut allergies?
Always double-check the brands you’re using, as some chocolate may be processed in facilities with nuts.
8. How can I make them healthier?
You can cut back on the sugar or use natural sweeteners like honey or agave syrup, but this may affect consistency.
9. What if my dough is too sticky?
You can chill the dough longer; if it remains sticky, add a bit more flour, but be careful not to overdo it!
10. Can I make these bites without any chocolate?
Of course! You can roll them in coconut flakes or simply enjoy them plain.
Conclusion
And there you have it—every scrumptious detail about making your very own Cookie Dough Bites (Quick + Easy Recipe!). This recipe is not just about indulging in a sweet treat; it’s about creating memories and sharing moments with loved ones. Whether enjoyed on a cozy night in or at a celebratory gathering, these bites are destined to become a favorite in your home.
Now I encourage you to give this fantastic recipe a try, and I’d love to hear how they turn out for you! Did you make any delicious variations? Be sure to leave a comment, and don’t forget to check out my other delectable recipes that can bring even more joy to your kitchen! Happy baking!

Cookie Dough Bites (Quick + Easy Recipe!)
Ingredients
Method
- Pre-Cook the Flour: Microwave the flour in a microwave-safe bowl for 1 minute 30 seconds, stirring every 30 seconds. Alternatively, bake at 350°F for 5-10 minutes until it reaches an internal temperature of 160ºF.
- Make the Cookie Dough: In a large bowl, mix the softened butter and brown sugar until creamy (about 2-3 minutes). Stir in the vanilla extract and milk. Gradually incorporate pre-cooked flour and salt until just combined, then gently fold in chocolate chips.
- Chill the Dough: Cover and refrigerate the dough for 10 minutes.
- Form Bites: Roll small portions of dough into balls and place on a lined baking sheet. Freeze for 15 minutes.
- Melt Chocolate for Coating: In a microwave-safe bowl, combine chocolate chips and oil. Microwave at 50% power, stirring every 30 seconds until smooth.
- Coat the Bites: Dip each dough bite in melted chocolate and place back on the lined baking sheet.
- Chill to Set: Refrigerate until the chocolate has completely set (about 10 minutes).