Delightful Spring Brownies: An Easy Recipe for Festive Treats
Ah, Spring! The season of blooming flowers, chirping birds, and the delightful aroma of something sweet baking in the oven. I can still remember those sunny afternoons spent on my grandmother’s porch, where we’d whip up a batch of brownies for our family gatherings. They were rich, fudgy, and always topped with colorful treats that screamed celebration! That’s why I love these Spring Brownies so much—they encapsulate every joyful memory I have of baking during the spring season.
These aren’t just any brownies; they’re an elevational twist on a classic recipe that will fill your home with that irresistible, mouthwatering scent—trust me, your family and friends will be racing to sample these beauties the moment they cool. The secret? A simple brownie mix that springs to life with vibrant toppings and optional frosting that showcases the best of springtime.
In this post, you’ll discover how to create these gorgeous, colorful Spring Brownies that will serve as the centerpiece of your next gathering. Plus, I’ll share my tips and tricks to ensure your brownies are the talk of the table. Let’s get our baking aprons on and dive in!
What Are Spring Brownies?
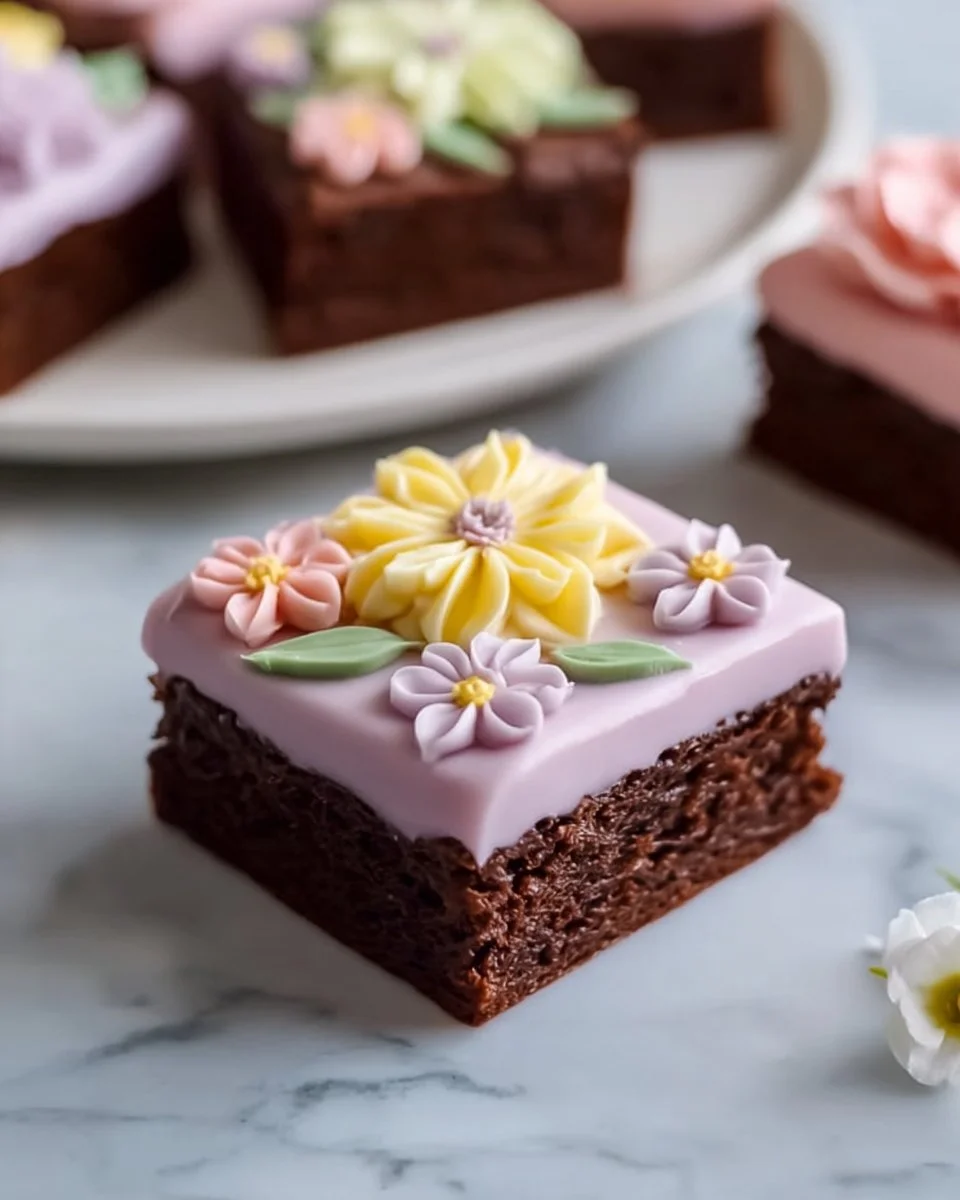
Spring Brownies represent more than just a dessert; they symbolize joy and warmth. Born from the classic chocolate brownie recipe, these treats embrace a fresh, festive flair that celebrates the season. Each brownie has a dense, fudgy texture that melts in your mouth with every bite, creating a rich experience that mixes chocolatey goodness with delightful crunch from our colorful toppings.
What makes these brownies truly unique is how easily you can customize them to fit any spring celebration. Whether it’s a birthday party, a picnic, or a simple family gathering, these brownies are perfect for any occasion. The pastel candies sprinkled on top add that magical touch, transforming each square into a mini work of art that captures the essence of spring. Make them when you’re hosting friends or just when you need a little sweet comfort on a rainy day—either way, they are sure to bring smiles!
Why You’ll Love This Recipe
Easy and Quick: This easy recipe uses a store-bought chocolate brownie mix, making the prep time a breeze. You’ll have delicious brownies in less than an hour—perfect for those last-minute cravings!
Cost-Effective: It’s budget-friendly! With just a few simple ingredients, you can whip up a gorgeous batch of brownies for a fraction of the cost of store-bought options, which often lack that homemade charm.
Fully Customizable: Want to add nuts? Go for it! Prefer a richer dose of chocolate? Toss in some chocolate chips! The options are endless, and you can tailor these brownies to everyone’s taste.
Instagram-Worthy: The addition of pastel candies and optional frosting swirls turns these brownies into a visual delight, making them ideal for spring celebrations. Everyone will want to snap a photo before taking a bite.
Crowd-Pleaser: These brownies are sure to impress! I’ve served them at potlucks and family get-togethers, and every time, they vanish within minutes. Don’t be surprised if you’re asked for the recipe—like I was!
Ingredients
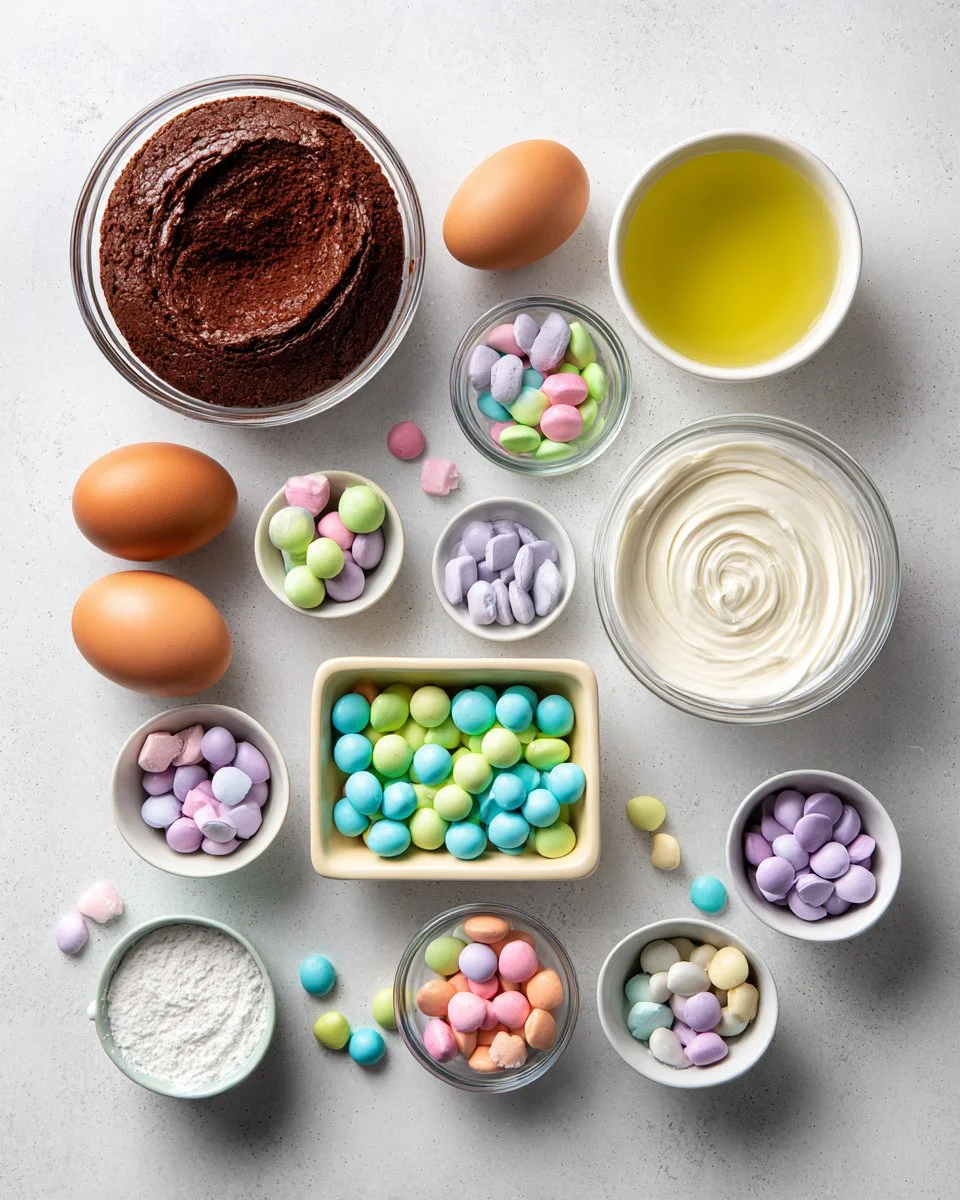
To create your delightful Spring Brownies, gather the following ingredients:
- 1 box chocolate brownie mix: Choose a high-quality mix like Ghirardelli or Duncan Hines for unbeatable taste.
- 2 large eggs: Ensure they’re at room temperature for a smoother batter.
- 1/4 cup vegetable oil: You can substitute with coconut oil for a hint of tropical flavor.
- 1/4 cup water: Simple, but necessary for the perfect texture.
- Pastel candies for topping: Think M&M’s or similar brands—choose bright colors to capture the essence of spring!
- Frosting for swirls (optional): I suggest using a creamy vanilla or buttercream frosting to enhance the chocolate flavor. You can even make your own if you’re feeling adventurous!
Prep Notes:
- For consistency, make sure your eggs are at room temperature.
- Measure all ingredients beforehand to streamline your baking process.
Step-by-Step Instructions
- Preheat the oven to 350°F (or follow the instructions on your brownie mix package).
- In a large mixing bowl, combine the brownie mix, eggs, vegetable oil, and water until the mixture is well-blended. You should see a rich chocolatey batter with no dry pockets left.
- Pour the batter into a greased or lined baking pan (an 8×8-inch pan works well). Use a spatula to spread it evenly.
- Bake according to package instructions—typically around 20-25 minutes. Keep an eye on them; they’re done when a toothpick inserted into the center comes out with a few moist crumbs.
- Once baked, let the brownies cool in the pan for about 10-15 minutes before transferring to a wire rack to cool completely.
- Decorate with swirls of frosting and sprinkle pastel candies generously on top, celebrating the blossoms of spring.
- Cut into squares and serve your fabulous Spring Brownies as a sweet treat for everyone to enjoy!
Chef’s Tip: If you’re unsure when they’re done, check at the earlier baking time. You can always put them back in for a few more minutes.
Expert Tips & Tricks
- Quality Control: Always use fresh eggs and high-quality brownie mix for the best results.
- Storage: Keep your Spring Brownies in an airtight container at room temperature for up to 4 days. They also freeze well—just wrap individual squares tightly in foil or plastic wrap.
- Make-Ahead: You can prepare the batter a day in advance and bake the brownies fresh when you’re ready to serve.
- Troubleshooting: If your brownies are too dry, consider reducing the baking time slightly or checking your oven temperature—oven variances can affect bake time.
- Brownie Bliss: If you’re a chocolate aficionado, substitute 1/4 cup of the vegetable oil with melted chocolate for an even fudgier consistency.
Serving Suggestions
Serve your Spring Brownies alongside a scoop of vanilla ice cream or a dollop of whipped cream for that extra indulgent touch! For presentation, consider placing them on a pastel-colored platter or tiered cake stand—perfect for spring gatherings and parties.
These brownies make an excellent centerpiece for Easter brunch, birthday parties, or spring picnics. They’re also fantastic with a cup of freshly brewed coffee or iced tea—nothing like a sweet treat to complement your favorite beverage!
Variations & Substitutions
- Expanded Flavors: Want to elevate the taste? Try swirling in peanut butter or cookie butter before baking for an extra layer of flavor.
- Dietary Options: For gluten-free friends, use a gluten-free brownie mix and ensure that your candies are also gluten-free.
- Seasonal Changes: Embrace other flavors by adding crushed mint candies for a mint-chocolate variation or peanut butter M&Ms for a nutty surprise!
Nutrition & Storage Info
- Prep time: 10 minutes
- Cook time: 25 minutes
- Total time: 35 minutes
- Yield: approximately 16 squares
- Estimated calories: 150 per serving (depending on candy and frosting used)
Storage Instructions
- Keep brownies at room temperature in an airtight container for up to 4 days.
- In the fridge, they can last about a week; in the freezer, expect 3 months of deliciousness!
FAQ Section
Can I use a different type of brownie mix?
Absolutely! You can experiment with various flavors like blondie or different chocolate mixes.How can I make them less sweet?
Consider using a darker chocolate brownie mix or omitting the frosting for a less sugary bite.Can I add nuts?
Yes! Chopped walnuts or pecans add a delightful crunch and a robust flavor.What if I don’t have vegetable oil?
You can substitute it with melted coconut oil, almond oil, or even unsalted butter for similar results!How can I make these brownies more chocolatey?
Add a cup of chocolate chips or chunks into the batter for an additional chocolate explosion.Can I make them vegan?
Sure! Use a flax egg (1 tablespoon ground flaxseed mixed with 2.5 tablespoons water), and swap the oil with applesauce.How do I know when they’re done?
Insert a toothpick into the center; if it comes out with moist crumbs, they’re perfect!Why did my brownies turn out too cakey?
This could be due to overmixing or baking for too long. Keep an eye on the time!Can I freeze them?
Yes, wrap each brownie square well in plastic wrap or foil and freeze up to 3 months.How should I decorate them?
Get creative! Try whipped cream dollops, fruit, or drizzles of caramel or chocolate sauce.
Conclusion
These Spring Brownies aren’t just a dessert; they’re a heartfelt homage to family traditions and fresh beginnings. There’s something truly special about creating these vibrant squares, watching them disappear from the plate as loved ones smile and compliment your baking skills.
So why not gather your ingredients and make a batch this weekend? I’d love to hear how they turned out for you—leave your thoughts in the comments below! And while you’re here, don’t miss my other delightful dessert recipes that bring a touch of spring to your kitchen. Happy baking!